 Forget the shopping malls. Today’s Tuesday Culver City Farmers Market is a great place for last minute Christmas shopping.
Strolling east along Culver Boulevard, you’ll find stands offering unique hand-crafted clothing and accessories, fragrant soaps and scents, and tempting treats. I am planning to pick up some Chocovivo stone-ground artisan chocolate and fresh roasted coffee as stocking stuffers for the grown-ups in my life. Visions of sugar plums may have tempted Victorian children listening to”The Night Before Christmas,” but freshly baked cookies from the Stone-age or Rockenwagner stands will be welcome by both Santa and those waiting up for them.
My mother carried on a family tradition by putting tangerines in our stockings. She’d search for fruit which still had stems and leaves attached, for a more festive look. After our family moved to California, my father presented her with her very own tangerine tree so she could continue the tradition with fresh-picked fruit from her own garden. Generations of her family celebrated Christmas along the cold and snowy Eastern seaboard. In the days before 24 hour air freight and the interstate freeway system, fresh oranges and citrus from Florida were rare and exotic winter treats. While we now take year-round availability of fresh fruit for granted, a basket of ripe heirloom and rare varieties of farmers market fruit still makes a thoughtful and appreciated hostess gift.
My mother and her east coast relatives never had the opportunity to participate in the tradition of making tamales for Christmas. For years after coming to California, I’d been lucky enough to be gifted with hand-made tamales from friends whose families had gotten together for pre-Christmas tamaladas, or tamale-making parties. Stories of those festive get-togethers reminded me of the important values of family and community which often seem to get lost in the commercialization of the holiday in our current society.
This past weekend, I finally was lucky enough to spend the damp and rainy Saturday making tamales with friends in a warm kitchen filled with conversation and family stories.
The actual process took two days from beginning to end. We did a little advanced planning, and two of us agreed to do the pre-tamalada shopping and prep work. Masa was item number one on our shopping list. Tamales’ sweet or savory filling is surrounded by a layer of masa, which is, in turn, enclosed in a wrapping of corn husks, banana leaves, or other material.
Masa harina is dry ground corn-meal from lime-slacked dried hominy (large corn kernels). Masa preparada is fresh, coarse-ground masa which has been beaten with shortening or lard, salt, and (sometimes) seasonings. If you are buying masa preparada, it is best to get it from a tortilla factory or a store with a lot of turnover. With prepared masa, the fresher the better.
The local Mexican-Latin American Top-Valu grocery store was our go-to source for masa preparada and masa harina, along with dried corn husks, chiles, and tomatillos. For years I’ve heard stories of dedicated abuelas, tias, and mamacitas rising before dawn to join early morning lines at tortillerias to purchase freshly-ground masa. We, wisely, I think, chose to sleep in and buy local. Top-Valu had stacks of bags of masa preparada from a Los Angeles-tortilleria, as well as pre-packaged commercially prepared bags of masa preparada in three and five pound sizes.
Using dehydrated, powdered masa harina allows you total control of your ingredients. Having tried both lard and non-lard based tamales, I much prefer the traditional tamales made with fresh-rendered pork lard. (Avoid the pre-packaged lard in paper-covered bricks if at all possible; fresh lard is head and shoulders above the packaged product.) Even my long-time vegetarian friend who was born and raised in San Antonio, Texas, agrees that lard-based masa makes better tamales. However, many people prefer to have vegan or vegetarian masa for health or religious reasons, and there are many fine recipes using vegetable shortening, butter, or oil.
On Friday, one of my friends made an excellent batch of pork in red sauce for one filling, and I tried my hand with making a green chile chicken filling.
My green chile chicken tamales were based on a recipe from Rick Bayless’ Mexico One Plate at a Time.
Tamales de Pollo con Chile Verde
(about 36 3-inch tamales)
1 3 1/2 lb. chicken, roasted, coarsely shredded
1 1/2 lb. tomatillos, husked and roasted
6 serrano chiles, stemmed and roughly chopped
(optional: one jalapeno chile, stemmed and roughly chopped)
6 large cloves garlic, peeled and roughly chopped
4 t. vegetable oil
4 – 4 1/2 c. chicken broth ( I used the chicken carcass and giblets to make the stock; you can used canned chicken stock if you prefer)
salt
1 packed c. roughly chopped fresh cilantro leaves
prepared masa
approximately 12 oz. dried corn husks
If you are planning to make your tamales the same day as you make the filling, start the corn husks soaking first. They will need to soak in very hot water for at least an hour before they are pliant enough for tamale-making. Use a plate or heavy bowl to keep the husks submerged while soaking.
(If you will be making the tamales over several days, start soaking the husks early in the day you plan to assemble the tamales.)
I roasted the chicken for an hour at 350 degrees, let it cool, and then removed the flesh. I put the skin and carcass, along with the neck and giblets in water to cover and simmered it on the stove while preparing the rest of the filling. After the stock was simmering, I shredded the chicken meat and put it in the refrigerator. Then, I washed and husked the tomatillos, and placed them on a baking sheet. I broiled them under very high heat for around 5 minutes, and then flipped them over and continued roasting them on the other side. Remove from heat and let cool. Remove any blackened skin, and transfer the tomatillos and rendered juices to a blender. Add the chiles and garlic, then process to a smooth puree.
Next, I skimmed the chicken broth to remove bones, skin and fat and set it aside. I heated the oil in a medium non-stick saucepan over medium high heat. When the oil reached the desired temperature, I added the puree all at once, stirring regularly. After about 5 – 7 minutes, when the puree was noticeably thicker and darker, I added two cups of the chicken broth. (If you are making chicken stock from scratch, remove any additional fat which has floated to the top of the pan before measuring and adding broth to the puree.) Continue simmering over medium heat until thick enough to coat a spoon heavily, about ten minutes. Add salt to taste. Stir in the chicken and heat gently for a minute or two. Remove from heat and add the cilantro. Let cool completely.
Now is the time to set up your assembly line for preparing the tamales. My friends had a kettle-sized tamal steamer, but you can steam tamales without one. I have used my Chinese bamboo steamer, which I’ve placed in a wok with several inches of water in its bottom. Other people improvise with collapsible vegetable steamers or plates set on top of coffee and custard cups in a large kettle. Loosely line the bottom of your steamer with corn husks to protect the tamales from the steam and add additional flavor.
The first work station will feature husk selection. The soaked husks should be removed from the water and toweled dry. Selecting the largest and most pliable husks, place them smooth side up. Choose other long husks, and tear them into narrow strips which will be used for tying the tamales.
The second work station will apply the masa. Laying a husk with the tapering end toward you, spread about 3 tablespoons of masa into a 3 – 4 inch square. The square will start along one side of the husk, and leave a 1/2 inch border on the wider side and 1 and 1/2 inch border along the tapering side. If you do not have a masa spreader or flexible narrow spatula, you can use your clean fingers or a corn husk to spread the masa on smoothly to a depth of about 1/2 inch.
Next stop on the assembly line is filling the tamal. About 1 – 1 1.2 tablespoons of filling is placed along the center of the masa, leaving 1/4 inch edge at the top and the bottom.
The filled tamal is then folded. When you pick up the two long sides of the corn husk and bring them together, the batter will surround the filling. With practice, you’ll develop a sixth sense of how best to fold the tamal. If your husk is wide, you can roll both sides over around the tamal in the same direction. If it is narrower, you can tuck one side under the other. I frequently wrap narrow tamales in another husk, or overlap two narrower husks when starting my masa base.
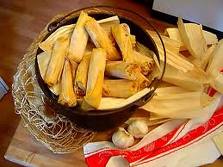
There are nearly as many different ways to finish wrapping tamales as there are tamale-makers. Wse started out making pork tamales. Our tamale tying specialist folded up the empty longer section of the husk and loosely tied a strip of husk around it. He left the top of the tamal open, and stacked them vertically into the steamer, leaving enough room around them so they could expand while steaming. He placed several soaked corn husks over the top of completed full steamer, to protect the tamales from too much steam and to add flavor to the finished product.
When it came time to change to our chicken filling, we tied the tamales differently so we could distinguish them from the pork ones. The masa layer was more evenly centered on the husk, so that both ends could easily be folded over and tied. I have also seen instructions where neither end is tied, and husks are placed both above and below the steaming tamales. There is no clear cut right or wrong way to finish your tamales, so experiment with what works best for you.
The final step is to steam the tamales. Set the lid in place and steam over medium heat for about 1 and 1/2 hours. Watch water level carefully; you don’t want all the water to boil away. Ensure even cooking by adding boiling water to the pot. Check for done-ness after around an hour, and periodically thereafter. The masa should be light and fluffy and the husks peel away from the masa easily. Let the tamales stand in the steamer for a few minutes. According to Bayless, steaming them twice for the best-textured tamales. He suggests letting the tamales cool completely, and then steaming them again for 15 minutes until they are fully reheated.
Finished tamales can be frozen and reheated. You can steam or microwave frozen tamales directly, but defrosting them overnight leads to better tasting tamales.
The Tuesday Culver City Farmers Market is held from 2 to 7 p.m. on Main Street between Culver and Venice Blvds.
Katie Malich benefited from many of the wonderful tamale-making videos on the internet. She also recommends searching the internet for vegan and vegetarian masa recipes. There are many out there; find one that looks good to you and enjoy.


Be the first to comment